yobit eobot.com

Announcement

Collapse
No announcement yet.

Suspension/body Lifts Info!!!!!!

Collapse
X
 
  • Filter
  • Time
  • Show
Clear All
new posts

  • Suspension/body Lifts Info!!!!!!

    RIGHT! for anybody who is thinking about doing a suspension lift or a body lift to their surf then this is the thread with all your answers!
    First up is the SUSPENSION lift.
    There are a few ways of doing this.........

    1: The Cheapest Way:

    The cheapest way to lift your surf is by fitting 2" spring spacers on the rear and raise the front torsion bars 2". not the best way as on road ride qulaity will suffer a lot. (not a comfy ride) This one is purely for looks.

    2: The Second Cheapest Way:

    The other cheap option is using what we call on here as the LANDCRUISER WAY aka LC way/setup.
    this is when you take Landcruiser springs (REAR ONLY!) from a HDJ80 Landcruiser (LC for short) and fit it to the rear of your surf. you can get the springs at a cost. of £55 for the pair at Milners Offroad. here is the link http://www.milneroffroad.com/categor...?cID=11455&p=2
    if you are planning on doing the work yourself, the LC springs are VERY stiff so may have to drop the axel to fit insted of using spring compressors. shame, but oh well
    The LC springs will give you about a 3" lift on the rear. not bad for about £55!!!
    you will however need to buy either +2" or +3" shocks to go with them. NOT the LC shocks!
    3: A More Expensive Way:

    basically the same but buying specific lift kits. they vary from around £275 - £500 for a 2" suspension lift kit.
    Benifits from these are they will have the neccesary brackets etc etc etc(saves you making them).

    Right, things you need to know when raising the rear this way. fitting instructions if you like?

    1: unclip the brake lines. (before you start! lol)
    2: unclip the LSV. (load sensor valve. this valve sends more power to the rear break drums when weight is incread in the back due to load or passengers)Make sure you unclip the pipe from above as so you dont muller it! Then see if there is enough play with the new springs on AND with the axel at its lowest point! (truck jacked up and axel hanging will show you this)
    if not then try rotating it 180 degrees. or totally unclip it and fab up a new bracket to fix it back down.
    3: remove the ARB's. (anti-roll bars aka sway bars) As the LC springs are much stiffer than the surf springs you can get away with removing the ARB's completely without noticing any body roll around corners.
    it is not recomended to completely remove the ARB's when installing aftermarket +2" springs. (LC's are ok) You can either extend the ARB's (aka sway bars) with longer bolts or droping the bracket somehow. (either buy specific sway bar disconect's from 4crawler.com or fab up a bracket)
    4: if this lift is only for cosmetic's and will not be seeing any (or hardly any) offroad use then you shouldnt need to extend your break lines. there should be enough ply on them to just fit back onwithout too much fuss. if you are going offoading then buy extended break lines!! you can get them from roughtrax. here is the link. http://www.roughtrax4x4.com/index.php?doc=87
    IMO worth doing regardless. they do not cost much and you will only benifit.
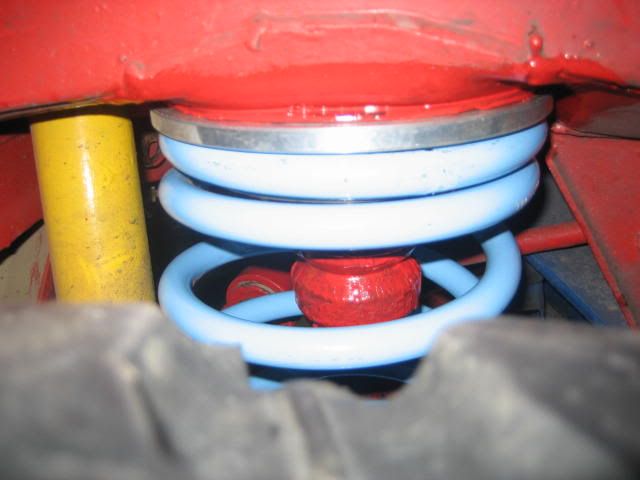
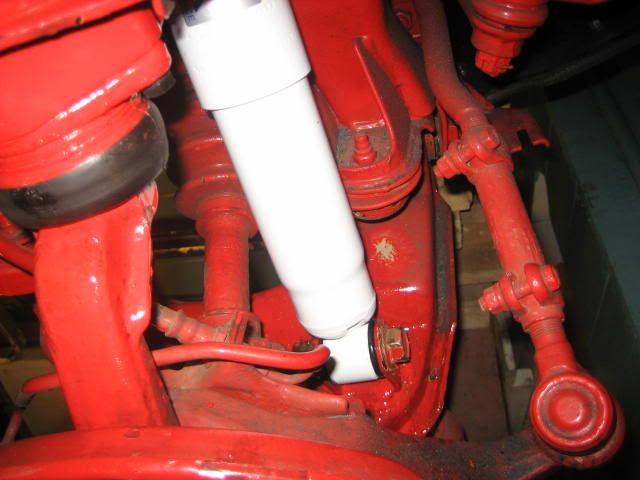
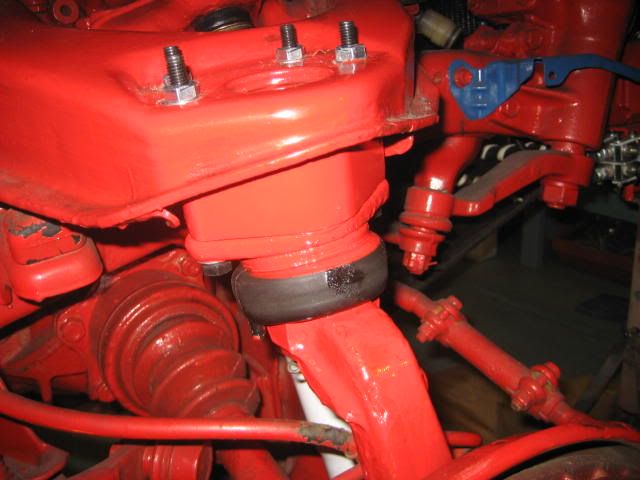
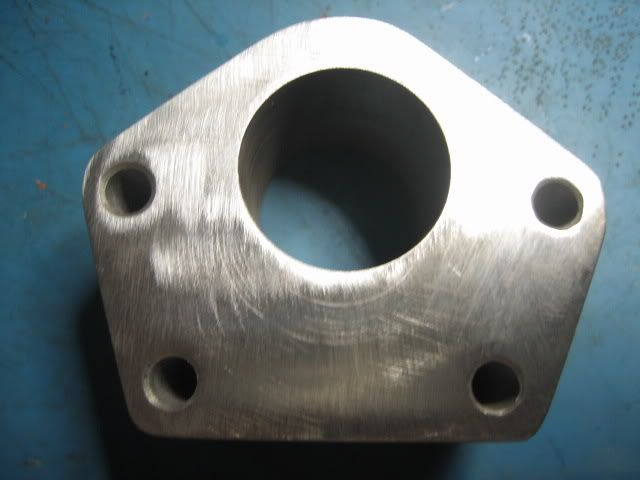
    5: With the LC springs, as they are a larger diamiter than the surf springs, you WILL NEED an Alloy Seat for them to fit snuggly into. otherwise your springs can slide out! (not good!)
    i bought mine from here for about £130 inc. delivery. http://www.outrageousoffroad.co.uk/
    here is a pic of what they look like fitted: (thank you POPEYE!)


    See POPEYES write up with pics for more info on fitting LC springs:

    Originally posted by POPEYE View Post
    Right next,,,,,,,,,

    REAR COILS,

    This is what I did to raise the rear suspension without it costing a fortune, theres a few ways of doing this, and it up to you which way you go, I fitted land cruiser springs but with these as I found out the hard way you defiantly need the alloy (or hard plastic) seats to fit between the top of the springs and the mounting, the spring “slips” out of line without these seats, two other ways of doing it is to either fit +2” longer surf springs or 2” block spacers on top of the original springs, whatever method you will need +2” longer shocks,

    Jack the truck up on the chassi as high as you safely can, support it well cos your going to be right under there, it helps if you have a pit or the use of one, having removed the wheels, jack up the axel to take it’s weight, and remove the ARB (if you intend to refit it you can just unbolt it from the axel but you will need drop brackets when you refit, these are either brackets or longer links on the end, using LC springs I left the whole thing off as these springs are much stiffer than the stock ones, I get no roll at all, but the ride is harder,
    next unbolt and remove the panard rod,
    Next unbolt both top radius (I think that’s wot their called) rods from the axel brackets, once you get the nuts off you’ll prob need to knock the bolts through using a drift or bar slightly smaller in dia than the bolts, they take some fiddleing out with a pribar,
    Next remove the shock absorbers, jack up or down to help with removal of the rods and shocks,
    Next, unbolt the break load sensor and you may have to unclip some break pipe above it, this is to avoid straining the pipes,
    Next lower the axel and remove the jack,
    At this point the old springs just about fall out, getting the new longer ones in will req some levering the axel down past it’s dead weight position either get some help or as I was on my own I used a length of 4x2, difficult hanging on the 4x2 and getting the spring in with one hand, I also cut half of the rubber bump stops off to make it easier to get the springs in,
    Once there in and positioned ok (the bottom of the spring sits in the shaped cup) slowly jack up and check the position as you go, I should add that if your using LC springs you need to remove the old top mount rubber and dump it, the new alloy seat just sits on the metal mount, not sure if you need to keep this rubber if your using longer surf springs or the spacer blocks, you’ll have to check with someone who’s fitted these,
    Jack up and refit the radius rods, this will req some greaseing and a FBH,
    That’s about it for the axel, next you can either lower the break load sensor unit via spacers and a bracket like I did or buy a longer hose, roughtrax do an exrended “braided” replacement one, up to you, fit your new shocks and the ARB if your keeping it,
    next fit the wheels and lower it down,
    next is the panard rod, you can go a few ways this this, either fit a drop bracket, this fits on the chassi end, or you can buy an adjustable rod, or what i did, i cut the rod roughly central, it's hollow BTW,then i refitted eack end and measured the gap now created by the lift, made a note of this and i then found some steel round bar that just fitted inside the rod, it needed some taping to get it in, tapped this bar into each end of the rod untill i had the req gap, made sure the bolt flanges lighned up and then welded it gradually building up so i could grind it down to the dia of the orininal rod, refit the rod, i also made a 2" bracket to "lift" the break pipe where it used to connect to the panard rod,
    have a drive and a bounce and just double check everything.
    LC springs wil give about 3” of lift, spacer blocks! What ever thickness you want, I would keep to around 2-3” at most tho,
    pics will give you some idea,


    Last edited by goodcat; 18 September 2009, 17:40.

  • #2
    Right next step is the fronts.
    Now you have raised the rear of your surf about 3" you need to raise the front accordingly.
    (With the LC lift, it will be fine to raise the front +2" instead of +3" like you have on the rear.)
    if you are only wanting a suspension lift for cosmetic purposes only, then the best way to raise the front is to wind up the torsion bars and lower the Dif by fitting a Dif bracket. this will help bring down the angle of the drive shaft (as it is now at a steeper angle due to raise the torsion bars) to a more horrizontal level. otherwise there will be excess stress put on your CV Joints and you will find you will have to replace them more often than what they would usually last. (no biggy as they are cheap to buy and easy to fit but for the sake of a Dif bracket you might aswell do it. less to worry about)
    please note that its not recomended raising the torsion bars more than 2" for on road OR off road use!! go over a big bump at speed and they can snap!
    you can buy uprated +2" torsion bars which ARENT 2" longer...they are just ALOT stiffer/tougher and are desinged to cope with them being wound up higher. (if you are intending on doing "serious" off roading then these are strongly advised)
    Roughtrax's sell some good ones for £150
    However as many guys on here will tell you from Experience, raising your standard stock torsion bars +2" will be fine for on road/green laning purposes.
    afterall its part of their design for them to be raised.
    This is one way of raising the front +2" to suit the rear lift you have just done.
    it also applys for any other type of rear lift that is no higher than 2-3". i.e fitting +2" springs on there rear and winding the torsion bars the same amount.


    OR you can fit Ball Joint Spacers aka BJ's (not blow jobs! )
    you can buy these in sizes of 1"..... 1&1/2".....2" or make them yourself.
    these cost "around" £45-£60.

    Here is POPEYES detailed write up for fiting 2" BJ's. THANKS AGAIN POPEYE!

    Originally posted by POPEYE View Post
    Well here goes, i'll do the rear and body a bit later
    2” BALL JOINT SPACERS,

    This is a quick write up regarding fitting ball joint spacers to obtain lift on the front suspension, you choose the lift by the thickness of the spacer you req, anything from ½” to 2”, it may be possible to fit even thicker spacers but personally 2” is as far as I’d go, any more and I’d recommend cranking up the torsion bars or preferably fitting +2” replacement bars, if you want even more lift there’s the body lift (up to 4” with some mods) more than that? Then go to the likes of LA Supertrux who will put it in orbit as long as you’ve the cash,
    When I did mine I had loads of help from guy’s on the site by way of advice and parts so a big thanks to you all, there are prob other maybe better ways of doing this mod but this is what I did and hopefully will help some of you who are planning on doing it, I know there are other “write up’s” about such as the Aus web site but I found some niggley little things missing, such as the need to bash out the ball joint original bolts as they are “drifted” into the ball joint flange, and no amount of hammering would shift em until I held them accross the open jaws of a vise and wacked em,
    Also bear in mind that doing this (2”) will put the camber of the front wheels out and make them “bow” in at the bottom so you will need to get that redone at the tyre place, (I still haven’t got this done with the result the front tyres are starting to wear on the outer edge,
    Right, first give all the nuts/bolts you are going to mess with a good WD40 ing,
    Jack up the truck on the chassi till the front wheels are off the deck, (having loosened the nuts)
    Remove the wheels and get a jack (found a trolly jack the best) and place it under the lower ball joint, jack it up till it just takes the weight of the truck from that side of the chassi jack, this means the top wishbone is now in the “under load” position (up at it’s normal height,
    Get a nice flat block of wood and place on the deck in line with the front edges of the wishbones (or as near as poss) measure from the top of the block of wood to the underside of the top wishbone, I had a length of steel box section and cut it to this measurement, I then cut the head off a bolt and welded it to the box section,
    This bit is now fitted under the top wishbone (the bolt goes in a hole already there, (drain hole I guess) and on the block of wood, I then nailed smaller blocks around the steel box to stop it slipping, the welded bolt at the top stops the top of it slipping, so you can work without the danger of it shooting off and doing your hands damage, this box section now keeps the top wishbone in the under load position, I found this way better than the “bit of wood jammed through the wishbone” method, all this makes it much easier to remove/refit the joint etc,
    Hook out the split pin from the joint castle nut (having both wheels clear of the deck makes it easy to swing the steering to either lock so you can get at this nut and the others easier) remove the nut and lower the jack under the bottom joint and knock the control arm free, a couple of sharp smacks got mine off,
    Undo the ball joint fixings from the top of the wishbone and tap the joint out, hold it accross the slightly open jaws of a vise and bang the old bolts out,
    Place two of the new longer bolts through the spacer and offer it up under the wishbone and determine how much metal you’ll have to remove till it sits comfortabley in place, Trial and error here as you only want to grind off as much as you req,
    Once the spacer fits snugly remove it and fit the four new bolts through the ball joint and then fit the spacer on this and fit this assembly up through the wishbone and bolt in place,
    Wriggle the control arm back into the taper as you jack up under the bottom joint and refit the castle nut, as tight as allows the hole and castle to line up for a new split pin,
    I should add that I replaced the angled grease nipple with a more upright one due to this now being down in the center hole of the spacer, just makes greaseing a bit easier,
    Finally and prob needless to say clean and oil all threads as ya go and take precautions when jacking, these are heavy trucks and will kill you if your careless, do it on flat hard ground and stick the two front wheels one on the other under there as an extra precaution, plus stands etc
    Fit your new shock absorber (+2”) and do it all over again on the other side,
    Refit the wheels and jacks down, all done, get the camber/tracking re done soon as poss
    I’d also recommend fitting either manual free wheeling hubs with this lift or spaceing the front diff and ARB down to suit the lift, as the drive shafts will new be at a steeper angle than before and will wear out the boots quicker


    here are some more pics:


    these are the spacers:


    please note that POPEYE has sprayed his BJ's red. they may be hard to see if you dont know where they fit or look like but you can make them out just ABOVE the black rubber bush thingy


    if your lifting your surf for off roading then DO NOT lower the Dif. it defeats the object of rasing things up! although the CV's will have more stress put on then due to steeper drive shaft angles, atleast some of the drive shaft will up in the air more and out of harms way from ruts and bumps etc. (less to take a hit basically) renewing CV's is all part of the off roading fun.

    OR you can comprimise and fit 1" or 1&1/2" BJ's and wind the torsion bars up the rest of the way to reach +2" - +2&1/2"
    you can even fit 2" BJ's and still wind up the torsion bars another 2" but im unsure as to what other bits need to be extended or modified. im sure others can comment on that side of things where your lifting the front that much higher.
    Last edited by goodcat; 16 September 2009, 12:03.

    Comment


    • #3
      Prototype Sticky For Lifting Your Surf.

      Right now onto a 2" BODY lift.
      again this is classed as pretty much the standard and most common lift people go for. A 2" BODY lift is about as far as you can go before you start getting into more complex matters involving adusting/lengthening other parts!!

      Its pretty straight forward and here is a good demonstration as to how to do it........... http://www.toyotasurf.asn.au/techsite/bodylift.htm

      With the 2" Body lift you WILL have to loosen the 3 clamps on the steering shaft. the steering shaft/column should have enough play in it to adjust itself when you go to tighten it back up again.
      but FFS dont forget to tighten it back up again!!

      Everything i have mention in this thread is all aimed towards achieving a +5" lift. 2" from a body lift and 3" from th suspension lift.
      the MINIMUM required lift to fit 33" tyres on your surf is 4". the reason we lift our trucks is to fit bigger tyres on so we can increase our GROUND CLEARENCE! this is very important for off roading. means more harder trails/tracks are accessable.
      oh and not to mention it LOOKS THE NUTZ!!!

      If i have left any minor details out or if other wish to contribute to this thread then PLEASE do so.
      The reason i have done this is so newer members can find all their info in regards to suspension lifts and body lifts all in ONE THREAD to make life easier for everyone.
      Obviously this isnt everything you need to know about Lifts but this is the START of an actuall Thread deicated to LIFTS in general no matter how small or high.
      if you want info on bigger lifts then ask youR questions IN HERE!!
      if you are still unsure about anything then ask your questions IN HERE!!
      if people fail to see this thread then simply give them a link to HERE!!

      it wont be long before there are pages of more info in this thread so nobody will ever have to search (or struggle searching) the forum again.

      Jay.

      p.s ill change the title if it gets approved as a sticky. hope you guys think its ok and a good place to start?
      Last edited by goodcat; 16 September 2009, 12:34.

      Comment


      • #4
        edit:
        Last edited by goodcat; 17 September 2009, 08:15.

        Comment


        • #5
          Ok, I will leave it as is then.
          Last edited by yoshie; 16 September 2009, 18:47.
          Brian

          Comment


          • #6
            EDIT: Yoshi cheers for your input. ive made a few edits on my first post. thanks for your advice mate.
            Jay
            Last edited by goodcat; 16 September 2009, 22:28.

            Comment


            • #7
              i just noticed that you quoted an older version before i had finished so there may have been a few alterations.
              Last edited by goodcat; 16 September 2009, 22:28.

              Comment


              • #8
                Originally posted by goodcat View Post
                firstly, what do you mean the shocks wont fit?! are you saying that i cant fit landcruiser shocks inside my landcruiser springs?
                Inside? They don't go inside the springs. Where did you get that idea from? LC shock absorbers won't fit a Surf.

                EDIT: Did you actually read/look at what you posted in your guide?
                Last edited by Albannach; 16 September 2009, 15:51.
                Do you know that, with a 50 character limit, it's

                Comment


                • #9
                  Originally posted by Albannach View Post
                  Inside? They don't go inside the springs. Where did you get that idea from? LC shock absorbers won't fit a Surf.

                  EDIT: Did you actually read/look at what you posted in your guide?
                  no not inside! lol sorry. behind and below them then. fcuk knows why i said that. thats not my belief at all! lol

                  and yes, your quite right. LC shocks wont fit on the surf. i got confused somewhere along the line. they will need to buy either +2" or +3" shocks to go with the LC springs.
                  Last edited by goodcat; 16 September 2009, 22:31.

                  Comment


                  • #10
                    As far as I'm aware, the LC ones won't fit (although I've not tried!).

                    I use +3" Procomps, about £35 each corner.
                    Do you know that, with a 50 character limit, it's

                    Comment


                    • #11
                      so...on topic i hope...

                      i have LC springs on the rear of my 2nd gen. im unsure if the front TBs have been wound up but it looks ok to me.

                      what do i have to consider in order to perform a 2" body lift given my current setup?

                      Comment


                      • #12
                        Originally posted by T1z3R View Post
                        so...on topic i hope...

                        i have LC springs on the rear of my 2nd gen. im unsure if the front TBs have been wound up but it looks ok to me.

                        what do i have to consider in order to perform a 2" body lift given my current setup?
                        Nothing, the 2 are mutually exclusive.
                        Do you know that, with a 50 character limit, it's

                        Comment


                        • #13
                          cool and thanks.

                          i was concerned id have to modify all manner of things to accomplish the mod.

                          Comment


                          • #14
                            Originally posted by T1z3R View Post
                            cool and thanks.

                            i was concerned id have to modify all manner of things to accomplish the mod.
                            Just follow the instructions on here somewhere (remember to slacken the 3 steering column bolts and the fuel filler hose).
                            Do you know that, with a 50 character limit, it's

                            Comment


                            • #15
                              Originally posted by Albannach View Post
                              As far as I'm aware, the LC ones won't fit (although I've not tried!).

                              I use +3" Procomps, about £35 each corner.
                              where did you get our procomps mate? had a look on LA supertrux but the rears are £123! that the ES 9000's though.

                              Comment

                              Working...
                              X